API Tools
Introduction
API Tools allow your bot to interact with external systems through API calls. Instead of only responding based on predefined knowledge or conversation flows, your bot can fetch, send, or update real-time data from other platforms.
This enables your bot to go beyond answering questions. It can perform actions and deliver dynamic responses based on live data.
Common Use Cases
API Tools can be used in various scenarios, such as:
- Retrieving customer data from your CRM or database
- Checking order or transaction status
- Creating or updating tickets in external systems
- Sending data to third-party platforms (e.g., forms, payment systems)
Where to Access API Tools
You can access API Tools from the bot configuration area.
Go to:
Bots → Select your bot → Tools → API Tools

From this tab, you can create, manage, and configure API integrations that your bot will use during conversations.
API Tools Form Explanation
Below are the explanation of each field to configure an API Tool and how to use them effectively.
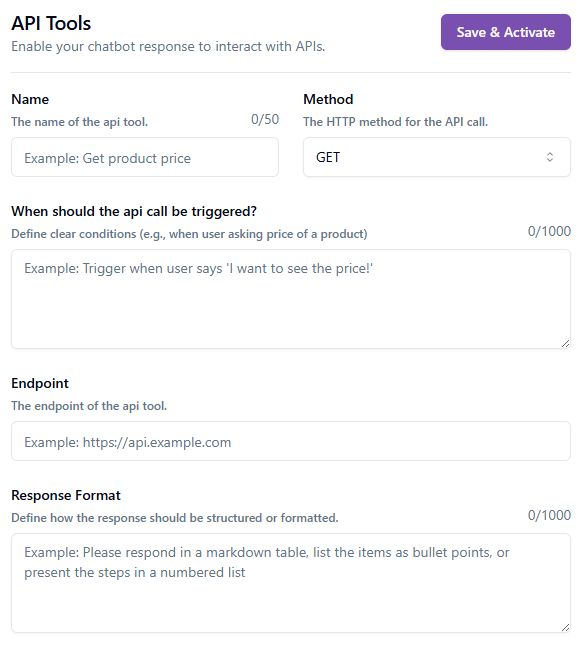
Name
This field defines the name of your API Tool.
Use a clear and descriptive name so it is easy to identify its purpose later, especially if you have multiple API Tools configured.
Example:
Get product price
Method
This specifies the HTTP method used for the API request.
Choose the method based on what the API endpoint requires:
- GET → Retrieve data (e.g., fetch product details)
- POST → Send or create data (e.g., submit a form)
- PUT/PATCH → Update existing data
- DELETE → Remove data
Make sure the selected method matches the API you are integrating with.
When should the API call be triggered?
This is one of the most important fields.
Define the conditions or scenarios when the bot should trigger this API call. The bot will use this instruction to decide when to execute the API automatically during a conversation.
Be specific and include examples of user intent.
Good example:
Trigger when the user asks about product pricing or says something like "I want to see the price"
Tips:
- Describe intent, not exact phrases only
- Include variations of how users might ask
- Avoid being too vague (e.g., "when user asks something")
Endpoint
This is the API URL where the request will be sent.
Provide the full and valid endpoint, including protocol (https://).
Example:
https://api.example.com/products/price
Ensure:
- The endpoint is accessible
- It matches the selected HTTP method
- Any required query parameters are included (if applicable)
Response Format
This field defines how the bot should present the API response to the user.
You are guiding the bot on how to structure the output, making it more readable and user-friendly.
Examples:
- Present data as bullet points
- Format response as a table
- Summarize key information in short sentences
- Show step-by-step instructions if needed
Example instruction:
Present the product name, price, and availability as bullet points
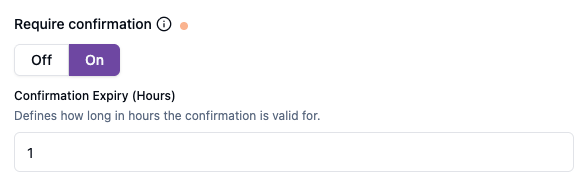
Require Confirmation
This option determines whether the bot needs user confirmation before executing the API call.
- On → The bot will ask the user to confirm before sending the API request
- Off → The API call will be executed immediately without confirmation
This is useful for actions that may have consequences, such as submitting data or triggering transactions.
Confirmation Expiry (Hours)
This field defines how long the confirmation remains valid after the user approves it.
If the API call is not executed within this time, the confirmation will expire, and the bot may need to ask for confirmation again.
Example:
If set to 1, the confirmation is valid for 1 hour.
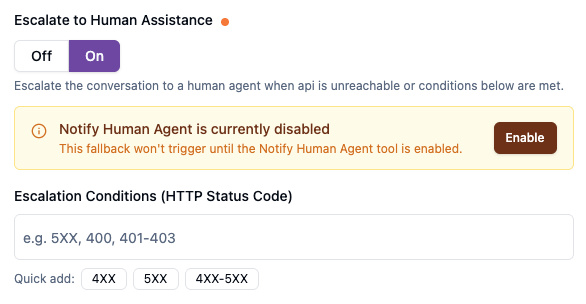
Escalate to Human Assistance
Enable this option to transfer the conversation to a human agent when the API call returns specific response status codes.
- On → The bot will escalate the conversation when the API response matches the defined conditions
- Off → The bot will not escalate, regardless of API response
This is useful when the API returns errors or unexpected responses that the bot cannot handle properly.
Example scenarios:
- API returns 5XX (server error) → system issue, requires human handling
- API returns 401/403 (unauthorized) → requires manual verification
- API returns 400 (bad request) → input may need clarification
The escalation will only be triggered if the response status code matches the conditions defined in the Escalation Conditions field.
Important:
To enable escalation, the Notify Human Agent tool must be activated.
Without this tool enabled, the system will not transfer the conversation to a
human agent even if the escalation conditions are met.
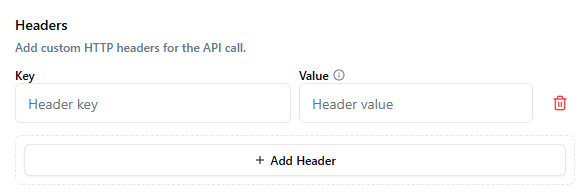
Headers
This section allows you to add custom HTTP headers to your API request.
Headers are used to pass additional information required by the API, such as authentication credentials, content type, or other configurations.
Each header consists of:
- Key → The name of the header
- Value → The value associated with the header
Common examples:
Authorization: Bearer <token>→ Used for API authenticationContent-Type: application/json→ Specifies the format of the request bodyAccept: application/json→ Defines the expected response format
Click + Add Header to include multiple headers if required by your API.
Tips:
- Ensure the header format matches the API documentation
- Double-check for typos, as incorrect headers may cause the API call to fail
- Keep sensitive information (like tokens) secure
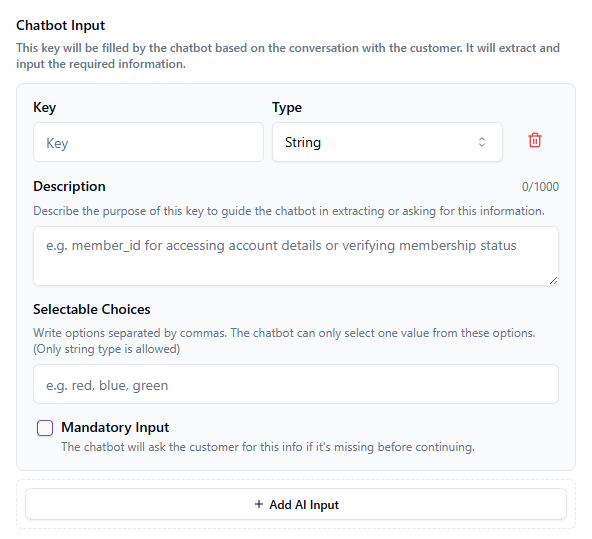
Chatbot Input
This section allows you to define the data that the chatbot needs to collect or extract from the conversation before making the API call.
The chatbot will automatically gather this information from the conversation or ask the user for it if it is missing.
Key
This is the variable name that will be used in the API request.
Use a clear and descriptive name that represents the data being collected.
Examples:
member_id, product_name, order_id
Type
This defines the data type of the input. Select the type based on the format required by your API.
Available types:
- String → Text-based input (e.g., name, product, ID)
- Number → Numeric values (e.g., quantity, price)
- Boolean → True/false values (e.g., is_member, is_active)
- Array → A list of values (e.g., multiple product IDs or selections)
Choosing the correct type ensures the data is properly structured when sent to the API.
Description
Provide a clear explanation of what this input is used for.
This helps the chatbot understand:
- What information to extract from the conversation
- When it should ask the user for this input
Example:
member_id for accessing account details or verifying membership status
Selectable Choices (Optional)
Define a list of predefined values that the chatbot can choose from.
- Values must be separated by commas
- The chatbot can only select one value from the list
- This option is only applicable for String type
Example:
red, blue, green
Use this when the input should be limited to specific options.
Mandatory Input
Enable this option if the input is required before the API call can proceed.
- Enabled → The chatbot will ask the user for this information if it is missing
- Disabled → The chatbot will proceed even if the input is not provided
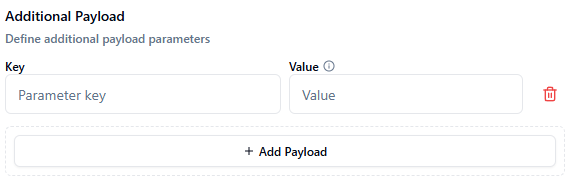
Additional Payload
This field allows you to include extra data in the API request that does not need to be collected from the chatbot conversation.
It is typically used for static or predefined values required by the API.
Key
This is the parameter name that will be sent in the API request.
Use the exact key expected by the API.
Examples:
source, channel, api_key
Value
This is the value assigned to the key.
You can define a fixed value that will always be included in the API request.
Examples:
web, chatbot, 12345
Final Step
After completing all required fields and configurations, click Save & Activate to enable the API Tool.
Once activated, your chatbot will be able to trigger the API call based on the conditions you defined and use the response to assist users during conversations.
Best Practices
To ensure optimal performance and reliability:
- Test your API Tool to confirm it works as expected
- Verify that all required fields and inputs are correctly configured
- Ensure your API endpoint is accessible and responsive
- Use clear trigger conditions to avoid unintended API calls
- Monitor responses to ensure they are properly formatted for the chatbot
